HTC headphone controller
December 2010
Background
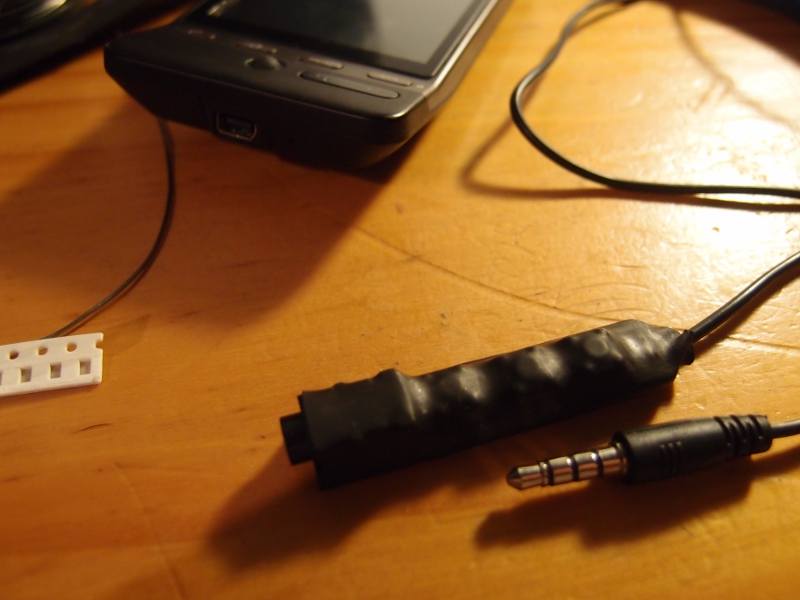
Dissatisfied with the standard headphone quality that shipped with my HTC phone, but not wanting to leave the ability to control the media application behind I designed and build an adapter which allowed any headphone to be plugged in to a custom controller.Design
Inspired by a Hackaday.com article which described the method by which these controllers worked, it was a very straightforward matter to design a simple controller.
The technical details revolved around grounding the function contact via different resistances:
- ~220 Ohms to skip back
- ~600 Ohms to skip forward
- 0 Ohms (short circuit) to pause/play
The main design aim however, was to make this as small and unobtrusive as possible, and package it attractively.
Designing a small device meant two things:
- Using a custom PCB
- Using small components
Designing a custom PCB was a matter of messing around in Eagle, but finding small, cheap tactile buttons proved to be challenge.
The components I settled on are listed below:
Components
- 3x SMD Tactile buttons (Jaycar SP0610 - note pack of 10)
- 1x SMD 3.5mm Audio Jack (Element14 1216980)
- 1x 0805 SMD 220 Ohm Resistor (Element14 1469899)
- 1x 0805 SMD 560 Ohm Resistor (Element14 1646455)
- 1x TRRS 3.5mm patch cable (eBay)
- 1x PCB
- Some 10mm heatshrink
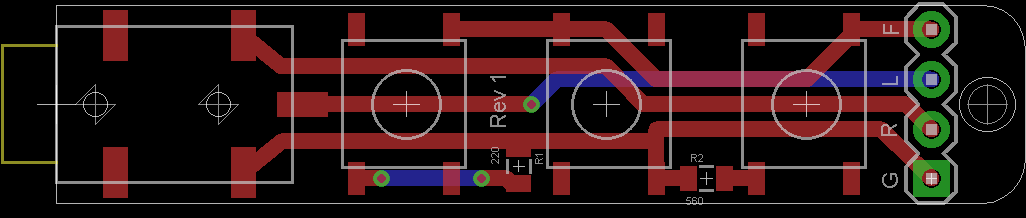
Printed Circuit Board
The board was designed in Cadsoft Eagle, and unfortunately uses two layers rather than just a single one - so etching it at home becomes a lot more difficult.
To manufacture the boards I used seeedStudio's Fusion PCB service. I was very happy with the speed and quality (especially for the price), they even threw in a bunch of extra boards on top of the 10 that I ordered.
I actually have a couple of spares that I can mail out, so send me an email if you're interested.
Update
A reader, Fahad Alduraibi, has contacted me with two tweaked version of my PCB!
I made two designs and wanted to share them with you.
The first one is exactly like yours but I swapped some of the JP2 pins and rotated the buttons 90degree to avoid the need for a second layer.
In the second design I made a small change where instead of using a 560Ohm for the third button I used a 390Ohm in series with the other 220Ohm. So the first button is connected to the 220Ohm and the third is connected to (220 + 390) = 610Ohm. Not a big deal here but might be useful if someone doesn't have a 590 and has the 390 instead!
Notes
A few notes should be added at the end here, firstly, this version of the controller does not have a microphone and some phones seem to assume that it is present, which means that you have to unplug everything if you get a phone call while the controller is plugged in (assuming you want to talk to the person who is calling you...). Perhaps a later version of the board will have a microphone (I couldn't source any piezo mics small enough when I looked).
Secondly, the heatshrink "case" isn't waterproof. I can't imagine that getting it wet would do much damage, but I have been wrong before. I wouldn't recommend submersing it.
Files


All files are licensed under the Creative Commons Attribution-ShareAlike license (CC BY-SA)
Eagle design files: Eagle libraries: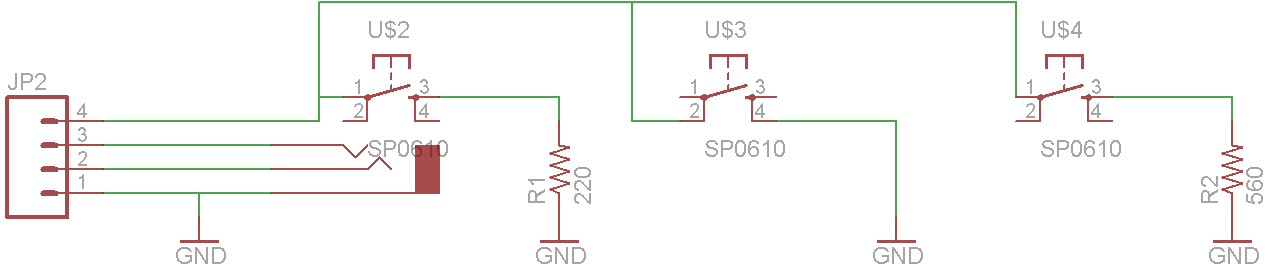